Setup OpenBSD NAS with Time Machine support
Introduction
NOTE! Netatalk versions < 2.2.0 do not work with Lion.
First I tried to setup Time Machine towards a OpenBSD based NFS server. For some reason this doesn't work in MacOS 10.5.7 or later. See NFSSetup for more information.
Next attemt was to add AFS (AppleShare File Server) support on the NAS server to see if that works better with Time Machine. As it turns out it does!
Prerequisites
First install OpenBSD as described in e.g. Remote Installation of OBSD 4.5 and see OpenBSD Installation Guide for more complete information. An even simpler solution, which also helps this excellent project, is to buy a CD set. See OpenBSD CD orders for more information. The CD set includes install instructions to get you going.
A typical OpenBSD install will not take much more than 5 minutes when you have done it a few times.
After a clean install I usually do two things.
- Configure
PKG_PATHenvironment variable to enable package installation. - Install
nanoas I don't like the defaultvieditor
This is how this is done.
export PKG_PATH=ftp://ftp.stacken.kth.se/pub/OpenBSD/4.5/packages/i386
pkg_add nano
Choose your favorite ftp mirror from Getting OpenBSD. Also make sure to choose the correct OpenBSD version and architecture.
Install AFS/Netatalk
It is really simple to setup OpenBSD to serve as an AFS file server. In the netatalk description it is described as a kernel level implementation of the AppleTalk Protocol Suite. As it turns out this setup does not require any kernel level changes (re-compilation) so I dont really understand in what way it is "kernel level".
There is also a fairly recent OpenBSD port of netatalk available.
To install netatalk is as simple as a single pkg_add command. It is assumed that PKG_PATH is setup towards your favorite ftp site as described above.
pkg_add netatalk
Netatalk is known to support routing, printing as well as file sharing capabilities. To setup netatalk only for file sharing turns out to be really simple. I mainly used the guide from BSDGuides below to do the initial setup.
First start the AFP service.
afpd
Setup an AFP user. This involves creating a new UNIX user and connect that user to be used in AFP. I had already setup a new user timemachine for this purpose. This users home directory will also be used for the file share available via AFP. -c initialize the AFP password file.
adduser
afppasswd -c
afppasswd -a timemachine
Then setup a file share volume to be available via AFS. Add the following to /etc/netatalk/AppleVolumes.default to share user timemachine home directory.
/home/timemachine timemachine allow:timemachnine cnidscheme:cdb options:usedots
Next you need to setup a "virtual server" for this AFP file server. Add the following to /etc/netatalk/afpd.conf. I call this virtual server "library".
"library" -uamlist uams_clrtxt.so,uams_dhx.so,uams_guest.so -loginmesg "Welcome to Library AFP Service"
To run AFP at boot add the following to /etc/rc.local.
echo -n ' afpd'; /usr/local/sbin/afpd
Also add a special file to time machine share.
touch /home/timemachine/.com.apple.timemachine.supported
This is actually it! The file share should now be available from your mac based workstation. Try to connect to the file share in Finder via Go -> Connect To Server and access the file share as follows. library is the name of the virtual server and timemachine the file share as specified before. Login using the password specified in afppasswd.
afp://library/timemachine
The file share should now show up in Finder.
Setup Time Machine to backup to AFP share
Now when we have a file share available via AFP we only need to reconfigure Time Machine to use this share instead.
Time Machine backup towards network share is not officially supported by Apple yet. To enable it in MacOS Leopard you need to set a certain flag to override the default behaviour.
defaults write com.apple.systempreferences TMShowUnsupportedNetworkVolumes 1
With this change the shared volume should show up as a volume under "Change Disk ..." in the Time Machine configuration window.
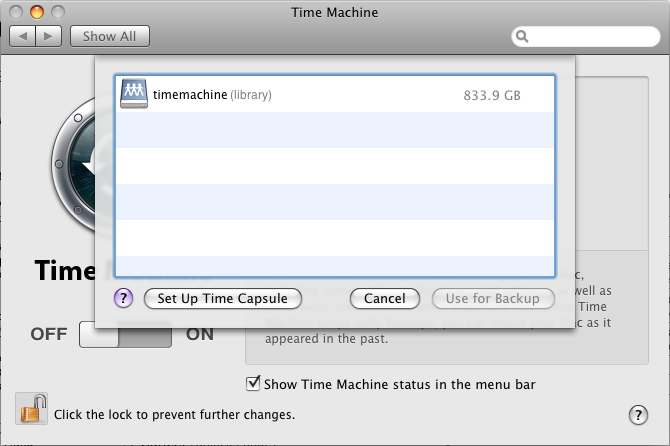
But, if you try to use this volume, this will not work directly. Time Machine will only work with a proper HFS+ formatted file system.
This means that we first need to create a HFS+ formatted file system image and locate that image on the file share to be used for the TM backups. We only have to ensure that the image has the correct format and naming. This is properly described in HowTo: Make Ubuntu A Perfect Mac File Server And Time Machine Volume under "Problems with creating the backup disk image".
The image shall be named as follows
<local_hostname>_<local_macaddress>.sparsebundle
You can find the mac address of your client machine via Network settings via Network -> Advanced - Ethernet or via dmesg. Hostname is found via hostname.
ifconfig
...
en0: flags=8863<UP, ...
ether 00:16:cb:ab:fd:fb
...
hostname
macmini.local
So in my case the file system image should be named
macmini_0016cbabfdfb.sparsebundle
The file system image should be created as a sparse bundle. A sparse bundle is a file system image of a certain maximum size. It is however not fully "inflated" but rather grow on disk when file system is filled. See Discovering Sparse Bundle Disk Images for more information.
The sparse image file system image is easily created using Disk Utiliy or via hdiutil. I created the sparse image with the following settings. I chose a file system size of 150% of the hard disk size of the machine to be backed up to support some additional history.
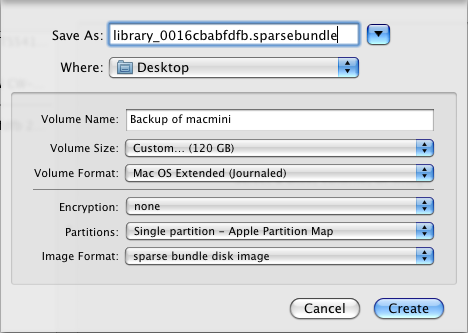
Now all you need to do is to move the newly created disk image to your AFP volume and configure Time Machine to use the volume once more. Just make sure to unmount the image before moving it. This time it should work!
Multiple mount problem
It seems that there is a problem to connect several shares/users to the same server. When one is connected a new connection is not possible for another user. Several shares accessible by the same user can be accessed at the same time.
Where is the limitation?
http://comments.gmane.org/gmane.network.netatalk.user/20398
http://comments.gmane.org/gmane.network.netatalk.user/20167
http://netatalk.sourceforge.net/wiki/index.php/MultipleServers
Define multiple virtual servers?
http://book.chinaunix.net/special/ebook/RedHat_Linux_Bible/8140final/LiB0228.html
When mounting through mount_afp multiple mount seem to work fine. It is also possible to auto-mount on login. $1 takes the value of the logged in user.
#!/bin/sh

# 1. Copy this file to a suitable location e.g. /Users/<user>/.mount_share.sh
# 2. Make sure it is executable
#    chmod +x /Users/<user>/.mount_share.sh
# 3. Add as login hook as ...
#    sudo defaults write com.apple.loginwindow LoginHook /Users/<user>/.mount_share.sh

su $1 -c 'mkdir /Volumes/<share>'
su $1 -c 'mount_afp afp://<afp_user>:<password>@<host>/<share> /Volumes/<share>'
Avahi setup
To enable afs shares to be advertized and mounted at boot from mac clients you need to use zeroconf solution like Avahi.
Follow the avahi install message.
Add multicast support by adding the following line to /etc/rc.conf.local.
multicast_host=YES
Start avahi daemons at startup.
echo -n ' avahi-daemon';   /usr/local/sbin/avahi-daemon -D
echo -n ' avahi-dnsconfd'; /usr/local/sbin/avahi-dnsconfd -D
Add service file for afp. Edit /etc/avahi/services/afp.service. Replace host-name with your host.
<?xml version="1.0" standalone='no'?><!--*-nxml-*-->
<!DOCTYPE service-group SYSTEM "avahi-service.dtd">

<service-group>
  <name replace-wildcards="yes">%h</name>
  <service>
    <type>_afpovertcp._tcp</type>
    <port>548</port>
    <host-name>library.lounge.se</host-name>
  </service>
  <service>
    <type>_device-info._tcp</type>
    <port>0</port>
    <txt-record>model=Xserve</txt-record>
  </service>
</service-group>
Avahi also need dbus. Install it via packages.
pkg_add dbus
And make it sure it starts at boot.
install -d -o _dbus -g _dbus /var/run/dbus
echo -n ' dbus'; /usr/local/bin/dbus-daemon --system
Now you should see the server from your local Mac client.
openmdns
A new mdns solutions is available from OpenBSD. See openmdns for more info.
Keyring problems
Sometimes the automatic keyring login can be wrong. Find the "Keychain Access" application and remove your stored key. When logging in to the AFP share the next time user name and password will be requested for.
References
- TimeMachine meet Netatalk (FreeBSD)
- Setup Appletalk/Netatalk on OpenBSD
- HowTo: Make Ubuntu A Perfect Mac File Server And Time Machine Volume
- http://archive.netbsd.se/?ml=bus&a=2008-05&t=7386848
- http://digitalnomad.de/blog/2009/04/28/alix-openbsd-nas-cron-time-machine/
- YAFB! Yet Another FreeBSD Blog
FreeBSD and Mac OS X: a happy combination - Time Machine, meet Netatalk
- YAFB! Yet Another FreeBSD Blog
Apple Time Machine + FreeBSD in 14 steps. - mdns nabble and mdns github - New mdns deamon developed primarily for OpenBSD. Try it!
Alternatives to Time Machine
If you dont want to use TimeMachine (on MacOS or on other OS's like OpenBSD) there are a number of free alternatives.
Many of us also setup a simple rsync script to perform basic backup functionality. See rsync for my simple setup. But I will try out some of the GUI based solutions for my OpenBSD based laptop.
- Flyback - also available as port
- RSnapshot
- TimeVault
- Dirvish
- LBackup
- NFSSetup - first attempt using a NFS file share
- BackInTime - Gnome GUI for rsync/cron based backups.
- Netatalk 2.2.1